Friday, October 27, 2017

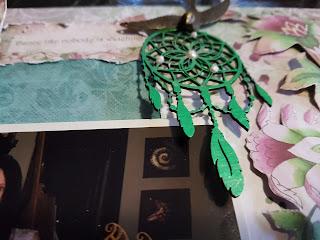
Bohemian Bouquet Layout Dream Catcher

 Love the New Bohemian Bouquet range from Couture Creations one of the new hot foil stamps I used on this layout.
 The new Bohemian Bouquet heat activated foils
 The new paisley Die, I can see myself using this for many projects to come a must have!
 Love this machine!!!!!
 Getting ready to create!
 Beautiful Gold foil!
Papers cut and ready to go!!
 
 Used the  Go Press and Foil Machine to foil and add some colour to my chipboard the green is amazing and fast becoming my favourite behind the gold lol!
 Everything placed and ready to go. Love it
 I distressed all the edges of the paper cut out and cut out extra flowers that I  embossed and placed raised with foam tape on the edge of the page.
 I added a few pear drops to finish of the chipboard and die cut a few paisleys.
 Added a few flowers and foiled flower.
The photo is of me about to head out for a night of dancing which I thought suited the colour scheme and the Bohemian Bouquet Design.
ENJOY!!!!

Tuesday, October 24, 2017

New Bohemian Bouquet

 Just a quick layout done today using the New Bohemian Bouquet 12x12 paper pad
 I printed 2 photos 1 6x4 and 1 5x7 of the same photo of my Oldest daughter Denee pregnant with her third child little Slater! I only used two sheets from the collection, Bohemian Bouquet chipboard, fletching background.
 I double matted both photos with a cream and light blue cardstock, I decided not to use ink on this layout and keep it clean and soft.

 I took a saying cut out from the paper pack and matted in a double mat with the cream and blue cardstock as used to mat the photos.  Also I embossed some soft green vellum with my Ultimate Crafts embossing folder Screen of Leaves, Using my Sizzix bigshot machine I then cut the embossed vellum in half, and placed just over to one side of the photos tying them together.
To finish of the layout I framed the outer edges of the layout with decorative pins and added 3 cut out butterflies to finish the page.
The saying is matted onto the chipboard which I left it's natural colour as it suited my photos .

Hope you enjoyed this little tutorial 
there will be more to come .....

Monday, October 16, 2017

2017 Fresh Start

Hi all time to get back to blogging, This year has been crazy. I am now happily married to my soul mate, best friend and my everything who fully supports my craft and recovering from the expense of a wedding lol. My son is only weeks away from completing grade twelve and I happily work 3 to 4 days a week luckily in the area of arts, not that I make much money but my arts and crafts supply is blossoming every day lol . Like I see it I'm saving for my retirement fund.

I have entered the world of Art Journaling and upcycling and love it that's in my spare time !!!
But my passion still remains with my Scrap Booking and paper crafts 20 years plus and I,m still going.

I am still teaching and classes are commencing back in November, including Scrap Booking, Card Making, Mixed Media Art, and Art Journaling / smash books. and Off the page creations.

I also plan on getting my book written  been off track with this one, as one does with life.
My Craft room has been reorganised and so has my office, the decluttering is done and now it's time for bigger things.

My Goals - Create teach and share my designs
                 - keep learning and exploring
                 - apply to Design Teams
                 - blog everyday!
                 - post regular posts on instagram
                 - live my creative life to the fullest........

So stay tuned as I share my Adventures with you all!!! 
Let's get creating !!!!!!!